 ITP just got some nifty flat panel mounts that can rotate 360 degrees. They’re very easy to move, it takes only one hand. When I saw them, I thought, “what good is a rotating mount if the content on the screen can’t rotate too?” So I came up with a little system to sense the screen’s rotation. Here’s how to turn those screens into a very big iPhone. Thanks to Michael Dory for his help in coding this and Dan O’Sullivan for the final clue.
The screens have a mac mini mounted on the back to display digital content. I added an Arduino with an accelerometer mounted on it to sense the angle of the screen’s rotation, then sent that data into Processing. This example doesn’t do much, but the code can be re-used for any Processing application that needs to know the screen’s rotation.
Rory Nugent modified my existing code and made it much better. I’ve incorporated his changes here, thanks Rory.
Part 1: The Hardware
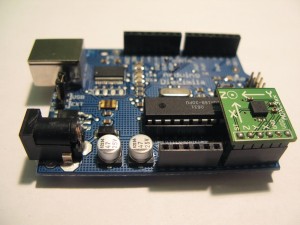
To do this quickly, I used an Arduino Diecimila and an ADXL330 accelerometer module that I had on my desk. Rather than set up a separate breadboard, I plugged the accelerometer directly into the analog pins of the Arduino.
But wait! How is the accelerometer powered by analog pins?
The analog pins of an Arduino can also act as digital I/O. Analog pins 0 through 5 correspond to digital I/O 14 through 19. The accelerometer draws very little current, less than the I/O pins can output. So I just used analog pins 0, 4, and 5 as digital outputs. They are digital outputs 14, 18, and 19. Digital output 18 acts as ground and 19 acts as voltage in for the accelerometer. digital output 14 keeps the self-test pin high.
Analog pins 1 through 3 are connected to the analog outputs of the accelerometer. This is a handy way to make a motion sensor with a minimum of parts. Now the whole board can be attached to the back of the plasma mount.
(Tip of the hat to Tod Kurt, who taught me this trick. This is how he wires BlinkMs to the Arduino)
Part 2: The Firmware
The Arduino firmware is pretty simple. It reads the accelerometer’s outputs and sends them to Processing using a call-and-response serial methodology. It also calculates the running maxima and minima of the X and Y channels, because Processing will need to know those in order to calculate the angle from the accelerometer values.
How does the call and response work?
Every time the Processing application that this Arduino is speaking to opens the serial port, it will reset the Arduino. In order to initialize serial communications, the Arduino starts out by sending a serial byte until it gets something back from Processing. Processing is buffering serial data until it sees a newline character, so serialEvent() is going to get triggered by a newline. So Arduino sends newlines intially. Processing will read those, and at the end of the first serialEvent(), send a newline back. Arduino, once it receives any character, will go into the main loop(). Here’s how that works in the setup():
void setup() {
  // initialize serial:
  Serial.begin(9600);

  // send a byte out the serial port until
  // you get one back in to initialize
  // call-and-response serial communication:
  while (Serial.available() <=0) {
    // take readings of the accelerometer while you wait for a call-and-response
    // doing this seems to clear out any initial garbage and settle down the ADC
    for (int channel = 1; channel < 4; channel++) {
      analogRead(channel);
      delay(10);
   }
    Serial.print("\n");
  }
}
In the main loop, Arduino listens for incoming serial data. When it gets a byte, it reads it. Doesn’t matter what the byte is, since it doesn’t do anything but read it to clear the serial buffer. When it’s finished sending all its data, it sends a Serial.println(). The newline in the println() triggers Processing’s serialEvent(), and Bob’s your uncle. Here’s how that works in the main loop:
void loop() {

  // only send if you have an incoming serial byte:
  if (Serial.available()) {
    // read the incoming byte to clear the serial buffer:
    int inByte = Serial.read();

    // do everything else here...

    // then send a newline:
    Serial.println();
   }
}
In my original version, I calculated maxima and minima on the fly and sent them to Processing, but Rory found it was more stable to do that on the Processing side. So the main loop in Arduino is actually quite simple. Here it is in its entirety:
void loop() {
  // only send if you have an incoming serial byte:
  if (Serial.available()) {
    // read and print the x-axis value from the accelerometer
    Serial.print(analogRead(3));

    // print a delimiter
    Serial.print(",");

    //read and print the y-axis from the accelerometer
    Serial.print(analogRead(2));

    // print carriage return and newline:
    Serial.println();

    Serial.flush();
  }
}
Here’s the Arduino code in full:
/*
  Accelerometer Reader

 Reads the X and Y of a 3-axis accelerometer

 The accelerometer, an ADXL330 from Sparkfun, is attached
 to analogs 1 through 3.  Analog pins 0, 4, and 5
 are used as digital I/O pins in this case, as follows:
 Analog  0 = Digital  14 = HIGH (accelerometer self test)
 Analog 4 = Digital 18 = LOW (accelerometer ground)
 Analog 5 = Digital 19 = HIGH (accelerometer Vin)

 Sends serial readings in this format:
  X, Y\r\n

 created 19 Sep 2008
 by Tom Igoe

 last modified 28 Oct 2008
 by Rory Nugent

 Recent Changes:
 Removed calculation of the max and min, sends only X-axis and Y-axis values, and
 configured a basic wait period after boot to wait for Processing and to throw out
 all readings during this period.
 */

int accelReading = 0;

void setup() {
  // initialize serial:
  Serial.begin(9600);

  pinMode(13,OUTPUT);

  // set up Analog 0, 4, and 5 to be
  // digital I/O (14, 18, and 19, respectively):
  pinMode(14, OUTPUT);
  pinMode(18, OUTPUT);
  pinMode(19, OUTPUT);

  // set pins appropriately for accelerometer's needs:
  digitalWrite(14, HIGH);    // acc. self test
  digitalWrite(18, LOW);     // acc. ground
  digitalWrite(19, HIGH);    // acc. power

  digitalWrite(13,HIGH);

  // send a byte out the serial port until
  // you get one back in to initialize
  // call-and-response serial communication:
  while (Serial.available() <=0) {
    // take readings of the accelerometer while you wait for a call-and-response
    // doing this seems to clear out any initial garbage and settle down the ADC
    for (int channel = 1; channel < 4; channel++) {
      analogRead(channel);
      delay(10);
   }
    Serial.print("\n");
  }

  digitalWrite(13,LOW);
}

void loop() {
  // only send if you have an incoming serial byte:
  if (Serial.available()) {
    // read and print the x-axis value from the accelerometer
    Serial.print(analogRead(3));

    // print a delimiter
    Serial.print(",");

    //read and print the y-axis from the accelerometer
    Serial.print(analogRead(2));

    // print carriage return and newline:
    Serial.println();

    Serial.flush();
  }
}
Part 3: The Software
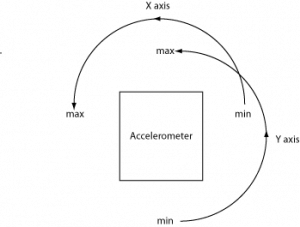
In order to derive angle from the accelerometer values, you need to know how the values are changing as you move the sensor. I tested by holding the accelerometer and Arduino vertically and watching the output of the axes. The output is like this:
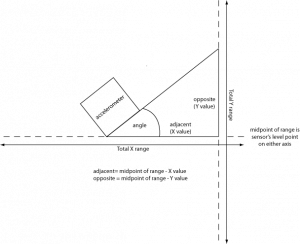
Knowing that, you can calculate the angle using a little trigonometry. Imagine the X and Y values as sides of a right triangle. The angle you want is the arctangent of the opposite divided by the adjacent side.
Here’s the Processing routine to calculate the angle. Note that it uses the arctan(x, y) function, which compensates for the fact that you have negative x and y values in some quadrants of the circle.
/*
  This method calculates the angle using the X and Y
 values of the accelerometer, and the midpoints
 of the X and Y ranges
 */

float calculateRotation(float thisX, float thisY, float midX, float midY) {
  float angle = 0.0;
  // the opposite side of the triangle is the distance
  // of the Y point from the middle of the Y range:

  float opposite = midY-thisY;
  // the adjacent side of the triangle is the distance
  // of the X point from the middle of the X range:
  float adjacent = midX-thisX;
  // you want to avoid a divide by zero error:
  if (adjacent != 0) {
    angle = atan2(opposite, adjacent);
  }
  // return the angle:
  return angle;
}
Here’s the Processing code in full:
/**
 * Accelerometer rotator
 *
 * Takes in accelerometer readings serially and uses them to rotate a circle and
 * arrow.
 *
 * Uses a call-and-response serial approach.  Sends newline (\n) to call
 * for more data
 * Serial readings are in this format:
 * X, Y
 *
 * created 19 Sep 2008
 * by Tom Igoe and Michael Dory
 *
 * last modified 28 Oct 2008
 * by Rory Nugent
 *
 * Recent Changes: Changed the code to handle raw X-axis and Y-axis values, Processing now calculates the max and min,
 * added a rough calibration feature, and added a simple smoothing algorithm to the X-axis and Y-axis values to cut
 * down on jitter.
 *
 */

import processing.serial.*;

Serial myPort;        // instance of the serial library
float myX, myY;       // X and Y readings
float myXmax = 0;  // calculated min and max X value
float myXmin = 1023;
float myYmax = 0;  // calculated min and max Y value
float myYmin = 1023;
float angle;          // angle to turn arrow to

float lastX = 0;
float lastY = 0;

boolean calibrationComplete = false;

int numSamplingVals = 5;

float[] recentX = new float[numSamplingVals];
int recentXlength = 0;
int recentXcurrent = 0;

float[] recentY = new float[numSamplingVals];
int recentYlength = 0;
int recentYcurrent = 0;

void setup()
{
  size(600,600);     // set the window size
  noStroke();        // no borders on objects you draw
  fill(255);         // fill with white
  frameRate(30);     // 30 frames per second
  smooth();          // smooth the edges

  // initialize the serial port:
  println(Serial.list());
  myPort = new Serial(this, Serial.list()[0], 9600);
  // only generate a serial event if you get a newline:
  myPort.bufferUntil('\n');
  // until there's data available, send a
  // newline character to prompt for data:
  while(myPort.available() < 1) {
    myPort.write("\n");
  }

  print(" *** To calibrate the screen, rotate it all the way to the left, rotate it all the way to the right, and then press ENTER or RETURN ***\n");
}

void draw()
{
  // make the background grey:
  background(102);
  // draw and rotate the arrow:
  drawArrow(angle);
}

void keyPressed()
{
  if(key == ENTER || key == RETURN){
    if(!calibrationComplete){
        calibrationComplete = true;
        print("*** CALIBRATION COMPLETE ***\n");
    }
  }
}

void serialEvent(Serial myPort) {
  // read the serial buffer:
  String myString = myPort.readStringUntil('\n');
  // if you got any bytes other than the linefeed:
  if (myString != null) {
    // trim off excess whitespace (such as the carriage return):
    myString = trim(myString);

    // split the string at the commas
    // and convert the sections into integers:
    int sensors[] = int(split(myString, ','));
    // if you got all seven numbers:
    if (sensors.length == 2) {
      myX = sensors[0];
      myY = sensors[1];

      if(!calibrationComplete){
        if(myX > myXmax) myXmax = myX;
        if(myX < myXmin) myXmin = myX;

        if(myY > myYmax) myYmax = myY;
        if(myY < myYmin) myYmin = myY;
      }

      //print(myX + "," + myXmin + "," + myXmax + "," + myY + "," + myYmin + "," + myYmax + "\n");

      // store the current X-axis and Y-axis value into an array for smoothing purposes
      recentX[recentXcurrent] = myX;
      recentXcurrent++;
      if(recentXcurrent >= numSamplingVals)
        recentXcurrent = 0;

      recentY[recentYcurrent] = myY;
      recentYcurrent++;
      if(recentYcurrent >= numSamplingVals)
        recentYcurrent = 0;

      // calculate the average of the current samples in the smooth array
      float recentXaverage = 0;
      for(int i=0; i < numSamplingVals; i++)
        recentXaverage = recentXaverage + recentX[i];
      recentXaverage /= numSamplingVals;

      float recentYaverage = 0;
      for(int i=0; i < numSamplingVals; i++)
        recentYaverage = recentYaverage + recentY[i];
      recentYaverage /= numSamplingVals;

      // save the smoothing average into the current X-axis and Y-axis for use
      myX = recentXaverage;
      myY = recentYaverage;

      // get X and Y, mapped to the window size:
      myX = map(myX, myXmin,myXmax,0,width);
      myY = map(myY, myYmin,myYmax,0,height);
      // calculate the midpoint of the X range:
      float thisMidX = width/2;
      // calculate the midpoint of the Y range:
      float thisMidY = height/2;

      // calculate the angle:
      angle = calculateRotation(myX, myY, thisMidX, thisMidY);
    }
  }
  // send a newline character to ask for more:
  myPort.write("\n");
}

/*
  This method calculates the angle using the X and Y
 values of the accelerometer, and the midpoints
 of the X and Y ranges
 */

float calculateRotation(float thisX, float thisY, float midX, float midY) {
  float angle = 0.0;
  // the opposite side of the triangle is the distance
  // of the Y point from the middle of the Y range:

  float opposite = midY-thisY;
  // the adjacent side of the triangle is the distance
  // of the X point from the middle of the X range:
  float adjacent = midX-thisX;
  // you want to avoid a divide by zero error:
  if (adjacent != 0) {
    angle = atan2(opposite, adjacent);
  }
  // return the angle:
  return angle;
}

/*
  This method draws and rotates the arrow
 */
void drawArrow(float thisAngle) {
  // move whatever you draw next so that (0,0) is centered on the screen:
  translate(width/2, height/2);

  // draw a circle in light blue:
  fill(80,200,230);
  ellipse(0,0,50,50);
  // make the arrow black:
  fill(0);
  // rotate using the heading:
  rotate((thisAngle));

  // draw the arrow.  center of the arrow is at (0,0):
  triangle(-10, 0, 0, -20, 10, 0);
  rect(-2,0, 4,20);
}
Part 4: The Installation
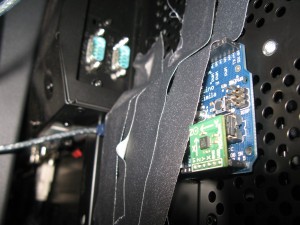
Once the code’s working, it’s simply a matter of installing the hardware on the back of the plasma. You need to align it with the screen’s edges, but a little gaffer’s tape holds it in nicely:
Once you’re all mounted, run the processing sketch, and your screen should know which way is up.
Thanks to Mike Dory for the pix and code encouragement, and Rory Nugent for the code improvements!


6 Replies to “Using an Accelerometer to Sense Which Way Is Up”
Comments are closed.