This tutorial explains how to read from Mifare RFID tags from your computer using a Sonmicro SM130 read/write module. The sketch below is written in Processing using my SonmicroReader library. The SM130 has a TTL serial interface that you can connect to a micocontroller, or to a personal computer through a USB-to-serial interface. Using the latter, it’s pretty simple to send serial commands to it and receive the data back. The entire Processing sketch can be downloaded here: rfid_simple_0001.
Circuit
Parts:
- Solderless breadboard
- SM130 RFID read/write module
- RFID antenna
- Mifare RFID tags
- FTDI USB-to-serial cable
- 22AWG solid-core hookup wire in red, black, and blue
- row of five male headers, 0.1 inch spacing.
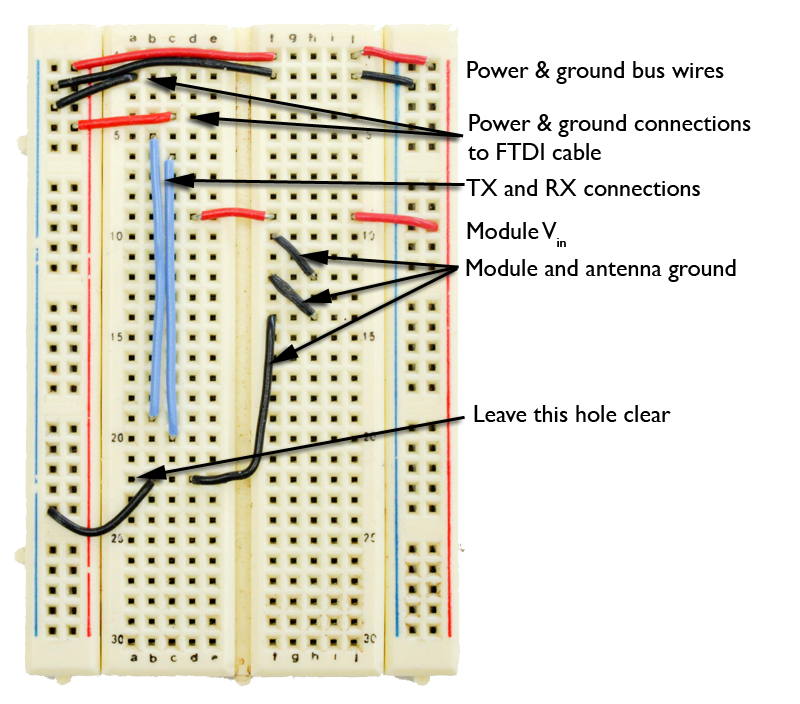
First you’ll need to wire up the solderless breadboard. Figure 1 shows the wiring layout. The red and black wires at the top of the board connect the power and ground buses on either side of the board. The next two wires down, black and red respectively, connect the power and ground buses to the FTDI serial cable. The vertical blue wires connect serial transmit (TX) and receive (RX) from the SM130 module to the FTDI cable. The red wires that come next power the module. The black wires below that provide ground connections for the module and the antennas. Note that the bottom black wire that connects to the ground bus has some slack in it. This is because the SM130 module plugs in right next to it.
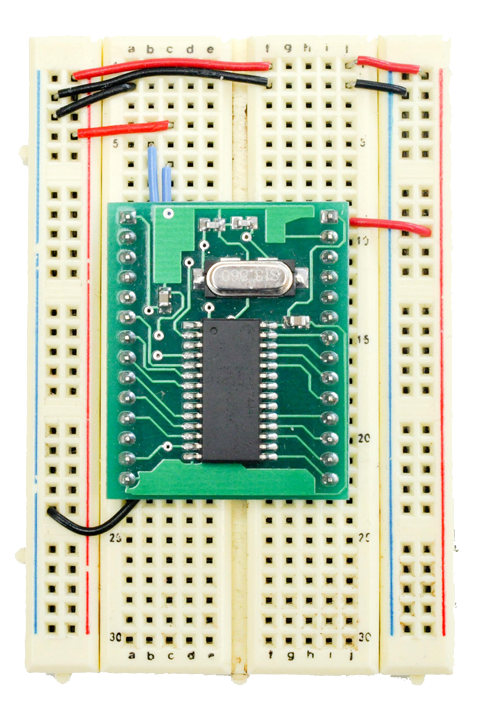
Next, add the SM130 module. The top of the module lines up with the red wires providing it with power. Make sure to line the module up all the way to the left hand side of the breadboard so you have a row of holes on the right for the antenna.
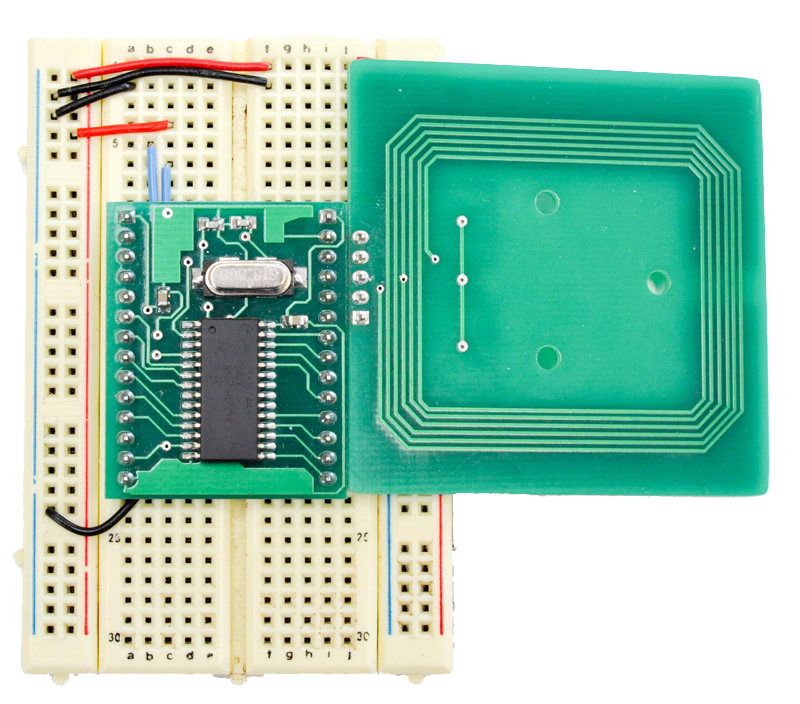
Next comes the antenna. The top pin lines up with the second pin on the right hand side of the reader, as shown in the Figure 3.
Finally, connect the FTDI cable using the male headers. The black wire of the cable lines up with the black wire just below the power and ground bus wires, as shown in Figure 4.
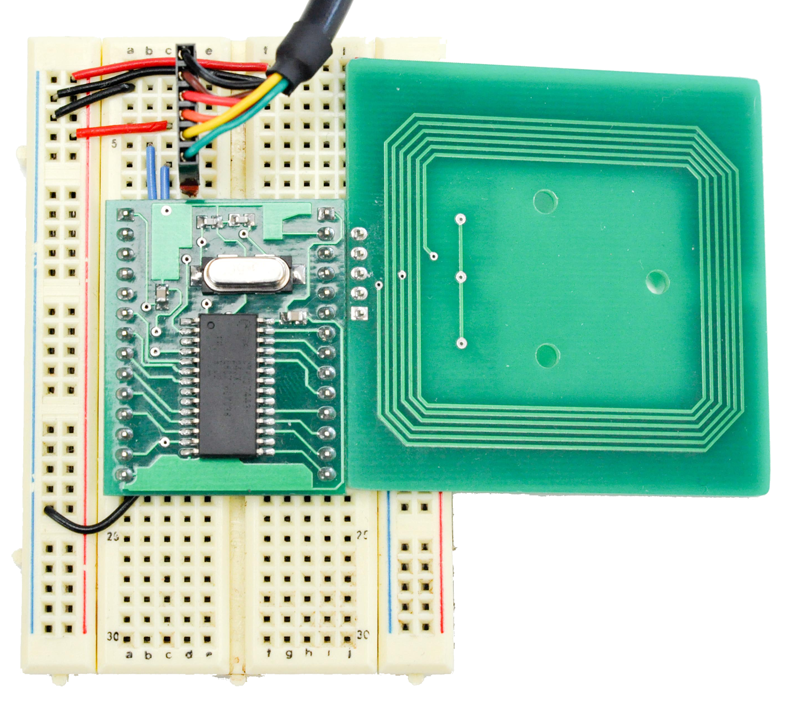
That’s all the wiring. Now you’re ready to start writing code for the module.
Code
There’s a lot you can make the SM130 do, but the simplest thing to do is to put it in seek mode and have it listen for a new tag. Here’s how to do that using my Processing library.
How do I read a tag’s ID number?
There are two ways to read a tag’s ID number: you can select tag, or you can seek tag. Select tag assumes that there’s a tag in the field of the antenna. Seek tag, on the other hand, puts the reader in a continuous loop where it waits for a tag to come into range, then automatically gives you the results when it has a tag.
Seek tag would seem to be the more useful function, since you don’t always want to have to issue a command right when the tag is in place. But it can be a bit tricky, because you can’t continually send a seek tag command, or you’ll lock up the module. If you seek when the module is idle, everything’s fine. The sketch below solves this problem by having the user issue the initial seek tag by hitting a keystroke, then waiting for a response. If the response indicates that a seek tag command was issued, and that a tag has been successfully read (you can get this from the error messages that the commands return), then the sketch prompts the module to seek tag again.
You’ll need to import both the sonMicroReader library and the serial library. You’ll also need a few global variables, as follows:
// import libraries:
import processing.serial.*;
import sonMicroReader.*;
Serial myPort;                // serial port instance
SonMicroReader myReader;      // sonMicroReader instance
int fontHeight = 24;          // font height for the text onscreen
String lastTag;               // last tag read
In the setup() method, initialize the window size, the serial port, and the sonMicroReader. You’ll also start the library instance (it spawns a separate thread so that it can listen for new data all the time), then send the module a reset command. Finally, initialize a font for writing on the screen:
void setup() {
  // set window size:
  size(400,300);
  // list all the serial ports:
  println(Serial.list());

  // based on the list of serial ports printed from the
  // previous command, change the 0 to your port's number:
  String portnum = Serial.list()[0];
  // initialize the serial port. default data rate for
  // the SM130 reader is 19200:
  myPort = new Serial(this, portnum, 19200);
  // initialize the reader instance:
  myReader = new SonMicroReader(this,myPort);
  myReader.start();
  myReader.reset();
  // create a font with the second font available to the system:
  PFont myFont = createFont(PFont.list()[2], fontHeight);
  textFont(myFont);
}
The draw() method doesn’t do much. It just draws a string to the screen containing the last tag read:
void draw() {
  // draw to the screen:
  background(255);
  fill(0);
  textAlign(CENTER);

  if (lastTag != null) {
    text(lastTag, width/2, height/2);
  }
  else {
    text("Hit any key to begin reading", width/2, height/2);
  }
}
Use a keyReleased() handler to prompt the reader to seek for a tag. That way, any key you hit will send a “seek tag” command. When the reader is seeking a tag, it goes into a waiting loop and automatically sends you the tag ID when a tag comes in range.
void keyReleased() {
  // for manually starting a seek:
  myReader.seekTag();
}
The sonMicro library generates an event whenever a new packet of data comes in from the reader called sonMicroEvent(). You write an event handler to catch that event and read the results, as folllows. This method reads the packet from the reader, looks for the last command, tag type, tag ID in the packet as well as any error messages. If all’s well, it prompts the reader to seek for another tag.
/*
 This function is called automatically whenever there's
 a valid packet of data from the reader
 */
void sonMicroEvent(SonMicroReader myReader) {
  // get all the relevant data from the last data packet:
  if (myReader.getTagString() != null) {
    lastTag = myReader.getTagString();
  }
  // get the error code and last command:
  int errorCode = myReader.getErrorCode();
  int lastCommand = myReader.getCommand();

  // a little debugging info:
  println("error code: " + hex(errorCode, 2));
  println("last command: " +  hex(lastCommand,2));
  println("last tag type: " + myReader.getTagType());
  println("last tag: " + lastTag);
  println("-----");

  // if the last command was seekTag, then you're either waiting,
  // or ready to seek again:
  if (lastCommand == 0x82) {
    if (errorCode == 0x4C) {
      // you're waiting for a tag to appear
    }
    if (errorCode == 0) {
      // you got a successful read;
      // wat, then read again
      delay(300);
      myReader.seekTag();
    }
  }
}
You may have noticed the delay before the seekTag() command. The SM130 really doesn’t like getting a lot of commands at a time, so the delay is just there to give it time to settle after reading a tag.
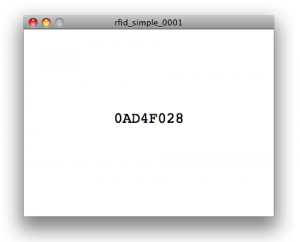
That’s the whole program. When you run it, hit any key to start it reading, then move different tags into the range of the antenna. You should see the different tags show up on the screen as you move them in range, as shown in the screenshot in Figure 5.
A full list of the commands available in the sonMicro library is available on the documentation page.
Here’s the code in its entirety:
/*
 SonMicro RFID Reader simple example
 Language: Processing

 This sketch uses the SonMicroReader library to demonstrate how to read from
 Mifare RFID tags using the SonMicro reader.

 created 6 March 2009
 by Tom Igoe
 */

// import libraries:
import processing.serial.*;
import sonMicroReader.*;
Serial myPort;                // serial port instance
SonMicroReader myReader;      // sonMicroReader instance

int fontHeight = 24;         // font height for the text onscreen
String lastTag;              // last tag read

void setup() {
  // set window size:
  size(400,300);
  // list all the serial ports:
  println(Serial.list());

  // based on the list of serial ports printed from the
  // previous command, change the 0 to your port's number:
  String portnum = Serial.list()[0];
  // initialize the serial port. default data rate for
  // the SM130 reader is 19200:
  myPort = new Serial(this, portnum, 19200);
  // initialize the reader instance:
  myReader = new SonMicroReader(this,myPort);
  myReader.start();
  myReader.reset();
  // create a font with the second font available to the system:
  PFont myFont = createFont(PFont.list()[2], fontHeight);
  textFont(myFont);
}

void draw() {
  // draw to the screen:
  background(255);
  fill(0);
  textAlign(CENTER);

  if (lastTag != null) {
    text(lastTag, width/2, height/2);
  }
  else {
    text("Hit any key to begin reading", width/2, height/2);
  }
}

void keyReleased() {
  // for manually starting a seek:
  myReader.seekTag();
}

/*
 This function is called automatically whenever there's
 a valid packet of data from the reader
 */
void sonMicroEvent(SonMicroReader myReader) {
  // get all the relevant data from the last data packet:
  if (myReader.getTagString() != null) {
    lastTag = myReader.getTagString();
  }
  // get the error code and last command:
  int errorCode = myReader.getErrorCode();
  int lastCommand = myReader.getCommand();

  // a little debugging info:
  println("error code: " + hex(errorCode, 2));
  println("last command: " +  hex(lastCommand,2));
  println("last tag type: " + myReader.getTagType());
  println("last tag: " + lastTag);
  println("-----");

  // if the last command was seekTag, then you're either waiting,
  // or ready to seek again:
  if (lastCommand == 0x82) {
    if (errorCode == 0x4C) {
      // you're waiting for a tag to appear
    }
    if (errorCode == 0) {
      // you got a successful read;
      // wat, then read again
      delay(300);
      myReader.seekTag();
    }
  }
}
One Reply to “Reading Mifare RFID Tags”
Comments are closed.